As someone who’s been scrolling away on social media for years, I never really paid much attention to the drastic differences in image quality until I made a goal of stepping up my photography game. It was something that always kind of flew under the radar. Sure, I was conscious that some images might look better than others but I never really took the time to understand why my images were looking like I took them with a Nokia flip phone. So I did what most everyone does. I blamed technology. I've bought new cameras, new phones, new apps, even new software. And wouldn’t you know it, the images look better and better every time. But to my surprise, my image quality on social media still just wasn’t improving. How can this be?! Well I've figured it out, and I'll show you how!
It's common knowledge that social media is for sharing. We all want to share our lives or business ventures or at the least stay connected with our friends. It’s likely why you enrolled onto your favorite platforms in the first place. Within these online community we are fed loads of information from the people we follow. From our greatest hits, to what we ate for breakfast. Most of it is enjoyable, some of it is downright upsetting, we surely see it all. But regardless of how it makes us feel we keep on scrolling and we keep on sharing.
So where do the problems start? Space. You probably don’t even think about it, but when you whip out your smartphone camera to take a quick picture, that picture is now taking up disk space. Whether it’s on your phone itself or on some cloud backup service. Regardless of it's file size, it exists. Now, add that those photos up over the course of a year, maybe 3, and you've probably received the dreaded “running low on disk space” notification. We jump into action, deleting duplicates, and backing our images up to some other location so we can take yet another picture of our lunch.
Well, you’re not alone in your problems. Social media giants have the same issues we all do, albeit on a much larger scale. Every second, you and millions of other people and businesses are posting and sharing information. Give or take, about 995 images per second to put a number on it. Be it words or images or files, it’s all data, and it’s got to go somewhere. There is so much data flying around that these businesses need to set up humongous data server farms all over the world in order to store all this information. I’m talking about warehouses larger than your local Costco club just to host hundreds of rows computer servers!
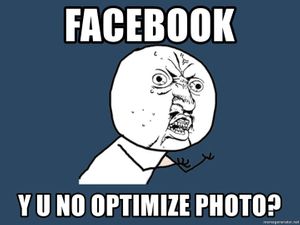
These companies aren’t stupid though. They realize the true game is won through maximizing efficiency. They want to stuff as many cookies in the jar as they can. Enter compression algorithms. The content moguls have developed an ideal image size to optimize not just the size of the data, but how quickly it can be distributed. For example, when you try to open a "large" file, it probably takes a few seconds. When you open a smaller file it will open in a fraction of that time. According to the ancient proverbs, "time is money". So if you're a business, and your clients are trying to open your latest image and they have to wait more than 10 seconds, you're likely going to miss that sale. Don’t let your audience pass by your beautiful work because the file is too big!
compression speed rating from HBO's Silicon Valley
“That’s great,” you say, nodding off to sleep, “now what can I do about it?”
If you're anything like me, you’re probably thinking you can just get around those noisy or slightly fuzzy images by just using better cameras or better technology. And to an extent you might be right. But if you're not using that technology properly, you’re probably still getting the same results.
You can’t outrun compression with more megapixels. If you thought updating to that latest smartphone because the amount of megapixels shot up faster than Tesla's stock price might get clearer social media images, you're going to miss the target. In fact, each social media website has their own guidelines on the appropriate pixels and image size in order to optimize speed and size of the data. So that latest phone you just bought with the 40mp camera, is really just working against you on social media. Yes, the images might look sharper, and it probably has some fancy portrait mode to apply a cheesy “bokeh” blur filter to your backgrounds, but your image sizes are going to be huge! Don't get me wrong, these larger mp cameras are great if you plan on printing on a billboard, but we’re talking about showing images to others who are using screens that are less than 2 feet from their eyes.
(Image) size matters:
When it comes to Facebook image sizes, there are a few different recommendations depending on where you're planning to use the image. For instance your profile picture and your wall post generally do have different size guidelines. Let’s focus on the more important option: wall posting.
From Facebook’s help guidelines, they recommend an image size with 2048px wide or smaller.
From Instagram’s help guidelines, they recommend an image size with 1080px wide or smaller.
To take it a step further, Instagram also recommends pairing this with an aspect ratio is between 1.91:1 and 4:5. It's important to make sure you're following these size constraints as well to avoid additional image compression.
It goes without saying there are a host of other platforms available. Odds are they too have a help section with their image guidelines. By referring to their dedicated information section, you can get ahead of the compression algorithms and make sure your images are going to be of better quality. For the sake of time, I’ll let you track down the rest yourself.
“Cool , but how do I resize my images?”
if you're snapping from your phone, you could just use the media platform's dedicated camera function. These will be optimizing your photos the moment you take them, which will help avoid additional compression.
If you are serious about your photography and still want more control over your images, you can still take your photo from your smartphone’s camera app or even a dedicated camera. However, you are likely going to need to resize them to follow the platform's compression rules.
There are a number of ways to resize your images. You can use some free web apps like Pixlr.com, or smartphone apps like SnapSeed, or a dedicated image editing software like Lightroom.
I typically resize my images in Photoshop or Lightroom by adjusting my export settings. There are numerous ways you can go about this, but I like start with the Instagram image size recommendations since they are the stricter of the two platforms I use, and well, I much prefer IG for displaying and viewing images.
When I have an image I want to share, I start with getting the correct aspect ratio, or "crop factor".
For IG I will use 4:5, either in landscape or vertical.
Pro tip: using a vertical crop will maximize your viewing area of your image when someone is scrolling past. So it's ideal to use a vertical crop when you want to draw attention to your photo.
Gripe: 4:5 crop really isn't ideal for your finished work, as most modern cameras utilize a 3:2 ratio. So, you’re likely going to have to make some important decisions about what to cut out.
Another pro tip: just go ahead and use 72 DPI for image resolution for any web and social media images. There is no noticeable difference in increasing this number unless you are doing physical printing - in which case you should be targeting 300 DPI (more on printing your images in a future blog post).
Hooray, your images are ready to share!
But wait, here's a bonus tip!
Of course, we want our images clear, but how do we get our images looking sharp?
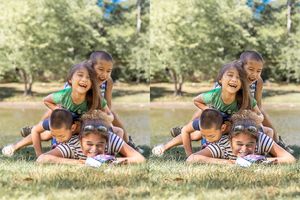
With the smaller image size restrictions, it might be that your image details might look a little, well, flat. So, it never hurts to punch up your image and add some extra sharpening to your images.
Again, you could use some of the sharpening filters available in your media platform, but I like to control my photos for a consistent viewing experience. So I sharpen my images in Photoshop using smart filters and actions. Here is a brief overview of how I sharpen my photos for Instagram and Facebook. And I mean, brief.
First open the properly sized image in photoshop and duplicate the original image layer twice to have 3 layers of the same image. Next, apply a high pass filter to the top two layers. Then set the blending mode on the first layer copy to “hard light”, and the second layer copy to “overlay”. Finally, simply bring down the opacity of those two layers so your image doesn’t look too crunchy (somewhere around 50-65% is usually good). The ideal sharpness is completely subjective, so experiment until you find what looks best to suit your style. Once you’ve got a look that you're satisfied with, just export it as a jpeg, and send it!

All that said, how you intend to display your digital images comes with some decisions to make.
Are you going to print them or only post to social media?
Although you can use one image size for both formats, they both require very different output settings to look their best.
As your photographer, it’s my goal to make your experience as painless as possible.
When my family and engagement photography clients intend to order printed images on their own, I provide them with 2 digital copies - one optimized for printing, and one optimized for social media. I do this for a few reasons. Number 1- I want you to be able to print copies of your images at their best possible resolution.
Number 2- I’m aware we live in the digital age and that you want to share your images with your friends and family. So I will do all the dirty processing work for you. You won’t even have to give it a second thought. Just print or upload your photos in seconds, put down the phone, and spend more time with your loved ones!
So, what did you think? What is your favorite social media platform? Have any other tricks for sharper images? Is there something you want to hear more about? Let me know below!
See you soon!
Sign up for my email newsletter and you'll receive FREE emails (normally a $700 value!) announcing upcoming events, contests, and my latest blog posts.
You'll also get advance notice of the coolest new promotions and qualify for special members-only deals!